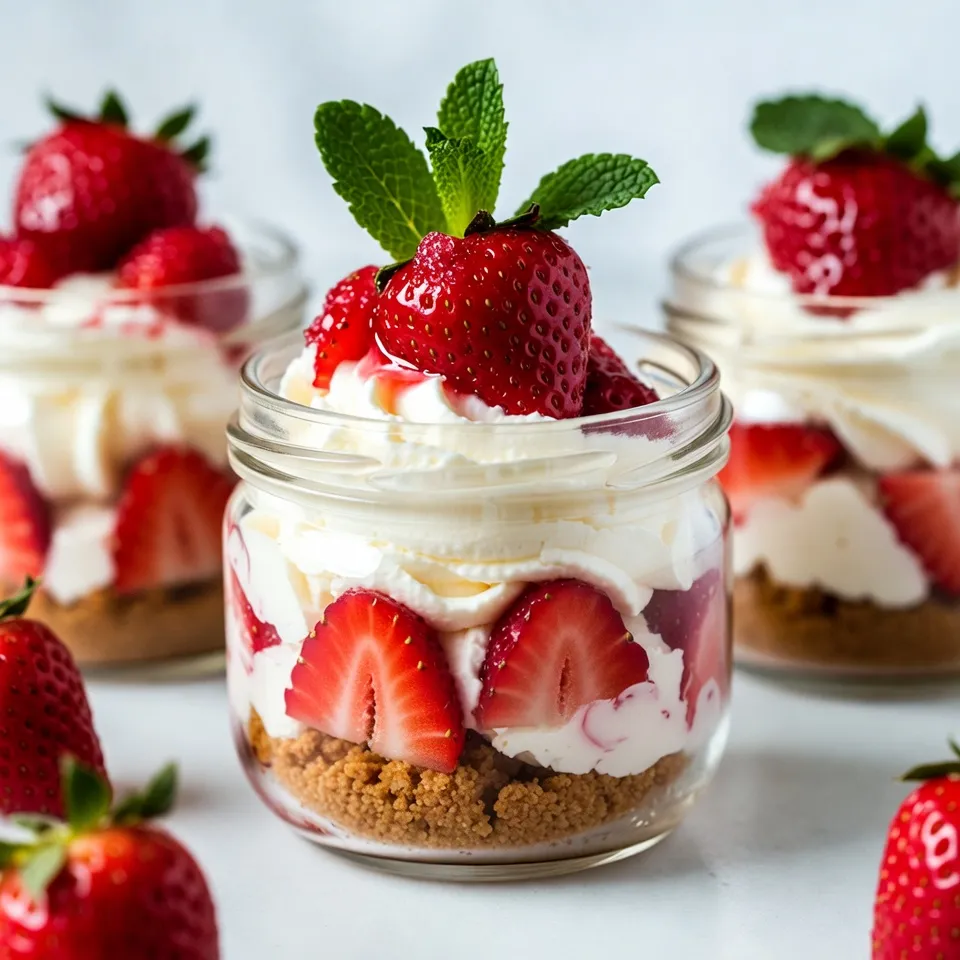
Craving a sweet, creamy treat that’s easy to make? Strawberry Cheesecake Jars are your answer! These delightful desserts combine fresh strawberries, a smooth cheesecake mix, and a crunchy graham cracker base. Not only are they tasty, but they also look amazing in jars. Join me as we explore simple steps, tips, and variations to make this treat your new favorite dessert. Ready to impress your friends and family? Let’s dive in!
Why I Love This Recipe
- Easy to Make: This no-bake dessert comes together quickly, with simple steps that anyone can follow, making it perfect for beginners.
- Beautiful Presentation: Layering the ingredients in clear jars creates an eye-catching display that is sure to impress guests.
- Fresh and Flavorful: The combination of creamy cheesecake and sweet, juicy strawberries creates a delightful burst of flavor in every bite.
- Perfect for Any Occasion: Whether it’s a casual family dinner or a festive celebration, these cheesecake jars are a versatile dessert that fits any event.
Ingredients
List of Ingredients
– 1 cup crushed graham crackers
– ¼ cup unsalted butter, melted
– 8 oz cream cheese, softened to room temperature
– ½ cup powdered sugar
– 1 teaspoon pure vanilla extract
– 1 cup freshly whipped cream (or store-bought whipped topping)
– 2 cups fresh strawberries, hulled and thinly sliced
– 2 tablespoons granulated sugar (for macerating strawberries)
– Fresh mint leaves for garnish (optional)
Ingredient Notes
You can swap the cream cheese for Greek yogurt for a lighter option. This change will still keep the creamy texture while cutting down on calories. For the whipped cream, use a dairy-free option if needed. Fresh strawberries are best, but you can use frozen ones if you thaw and drain them first. If you want a sweeter crust, add a bit of sugar to the graham cracker mix.
Nutritional Information
Each jar contains about:
– Calories: 320
– Total Fat: 22g
– Saturated Fat: 12g
– Cholesterol: 60mg
– Sodium: 180mg
– Total Carbohydrates: 30g
– Dietary Fiber: 1g
– Sugars: 14g
– Protein: 4g
This information can help you plan for dietary needs or just satisfy your curiosity! Each jar packs a delicious punch, perfect for a sweet treat without going overboard on calories.

Step-by-Step Instructions
Preparing the Strawberry Layer
To make the strawberry layer, take two cups of fresh strawberries. Hull and slice them thin. In a medium mixing bowl, combine the sliced strawberries with two tablespoons of granulated sugar. Toss gently to coat each slice in sugar. Let this sit at room temperature for ten to fifteen minutes. This step helps the strawberries release their juices and creates a yummy syrup.
Making the Graham Cracker Base
For the graham cracker base, grab one cup of crushed graham crackers. Mix them in a medium bowl with a quarter cup of melted unsalted butter. Stir well until every crumb is coated with butter. This will be the tasty crust for your jars.
Creating the Cheesecake Mixture
In a large mixing bowl, add eight ounces of softened cream cheese. Use an electric mixer to beat it until smooth and creamy. Gradually add half a cup of powdered sugar and one teaspoon of pure vanilla extract. Mix until combined. Then, fold in one cup of freshly whipped cream. This makes your cheesecake light and fluffy.
Assembling the Jars
Start layering your jars by adding about two tablespoons of the graham cracker crust at the bottom. Next, add a layer of the cheesecake mixture over the crust. Follow this with a layer of the sweet strawberries and some syrup from the bowl. Repeat these layers until the jar is full. Finish with a bright layer of strawberries on top for a lovely look.
Chilling Before Serving
Cover each jar with a lid or plastic wrap. Place them in the refrigerator for at least two hours. For the best taste and texture, chill them overnight. This time helps the flavors blend and firms up the cheesecake.
Final Touch: Serving and Garnishing
When it’s time to serve, take the jars out of the fridge. For a pretty finish, add a sprig of fresh mint on top of the strawberries. This adds a nice pop of color and a hint of freshness. Enjoy your delightful strawberry cheesecake jars!
Tips & Tricks
Tips for Perfecting the Cheesecake Mixture
To make a smooth cheesecake mixture, start with softened cream cheese. Beat it well until it’s creamy. Add powdered sugar slowly to avoid lumps. Mix in pure vanilla extract for flavor. When you fold in the whipped cream, do it gently. This keeps your mixture light and fluffy. A great texture makes your jars delicious.
How to Prevent Sogginess in the Crust
To keep the crust from getting soggy, let the graham cracker mixture cool before layering. Use just enough butter to hold the crumbs together. Too much can make it wet. Layer the crust first, then follow with the cheesecake. This barrier helps protect the crust during chilling.
Techniques for Layering and Presentation
When you layer your jars, start with two tablespoons of crust. Add the cheesecake mix next, then the strawberries. Repeat until the jar is full. Make sure to finish with strawberries for a pop of color. Use clear jars to show off your layers. A sprig of mint on top adds a nice touch!
Pro Tips
- Use Fresh Strawberries: For the best flavor and texture, always opt for ripe, fresh strawberries. They will enhance the overall taste of your cheesecake jars.
- Chill Longer for Better Flavor: While 2 hours is the minimum chill time, refrigerating overnight allows the flavors to meld beautifully, resulting in a more delicious dessert.
- Customize the Layers: Feel free to get creative with your layers! Add a layer of crushed nuts or chocolate shavings for added texture and flavor contrast.
- Presentation Matters: Use clear jars to showcase the beautiful layers of your dessert. A simple garnish of mint leaves adds a fresh touch and enhances visual appeal.
Variations
Flavor Alternatives
You can switch up the fruit in your jars. Try blueberries, raspberries, or peaches. Each fruit gives a unique taste. You can also use flavored extracts like almond or coconut. These flavors add a fun twist to the classic recipe.
Creative Crust Ideas
The crust doesn’t have to be just graham crackers. Consider using crushed Oreos for a chocolatey base. You can also use crushed pretzels for a salty crunch. If you want a gluten-free option, use almond flour or gluten-free cookies. Each choice makes your dessert special and fun.
No-Bake vs. Baked Cheesecake Jar Options
You can choose to make a no-bake cheesecake or a baked version. No-bake is easy and quick. Just mix and chill! On the other hand, a baked cheesecake has a firmer texture. It requires more time but can be very rewarding. Both options taste great in jars!
Storage Info
How to Store Strawberry Cheesecake Jars
To store your strawberry cheesecake jars, cover them tightly. You can use lids or plastic wrap. This keeps the cheesecake fresh and prevents any odors from the fridge from seeping in. Make sure to store the jars in the main part of your fridge, not the door. The main area stays colder and helps maintain the creamy texture.
Shelf Life and Freezing Tips
The jars will last for about three to four days in the fridge. After that, the strawberries may lose their freshness. If you want to keep them longer, consider freezing them. However, freezing may change the texture of the strawberries. To freeze, wrap each jar in plastic wrap and place it in an airtight container. These can last for up to two months in the freezer.
Best Practices for Serving After Storage
When you are ready to serve, remove the jars from the fridge. If you froze them, let them thaw overnight in the fridge. After thawing, check the texture. If the cheesecake seems too soft, you can refrigerate it for a bit longer. Before serving, add fresh mint for a nice touch. This will perk up the flavor and make your jars look beautiful!
FAQs
Can I make Strawberry Cheesecake Jars in advance?
Yes, you can make these jars ahead of time. I often prepare them a day before serving. This allows the flavors to meld and the texture to set. Just remember to cover them well to keep them fresh.
How long should I refrigerate the jars before serving?
Refrigerate the jars for at least 2 hours. However, chilling them overnight works best. This gives the cheesecake time to firm up and blend with the strawberry layer.
Can I use frozen strawberries instead of fresh?
You can use frozen strawberries. Just thaw them first and drain extra juice. Frozen berries can be a great option when fresh ones are not in season.
What can I use instead of cream cheese for a healthier version?
For a healthier option, try Greek yogurt or cottage cheese. Both provide a creamy texture with less fat. Blending them with a bit of honey can add sweetness too.
You learned how to make delicious strawberry cheesecake jars. I shared key ingredients, step-by-step instructions, and helpful tips. You can easily mix things up with flavor variations or simple crust swaps.
Remember, proper storage keeps your treats fresh. You can make these jars in advance for an easy dessert. Enjoy trying this fun recipe, and impress your friends and family with your skill