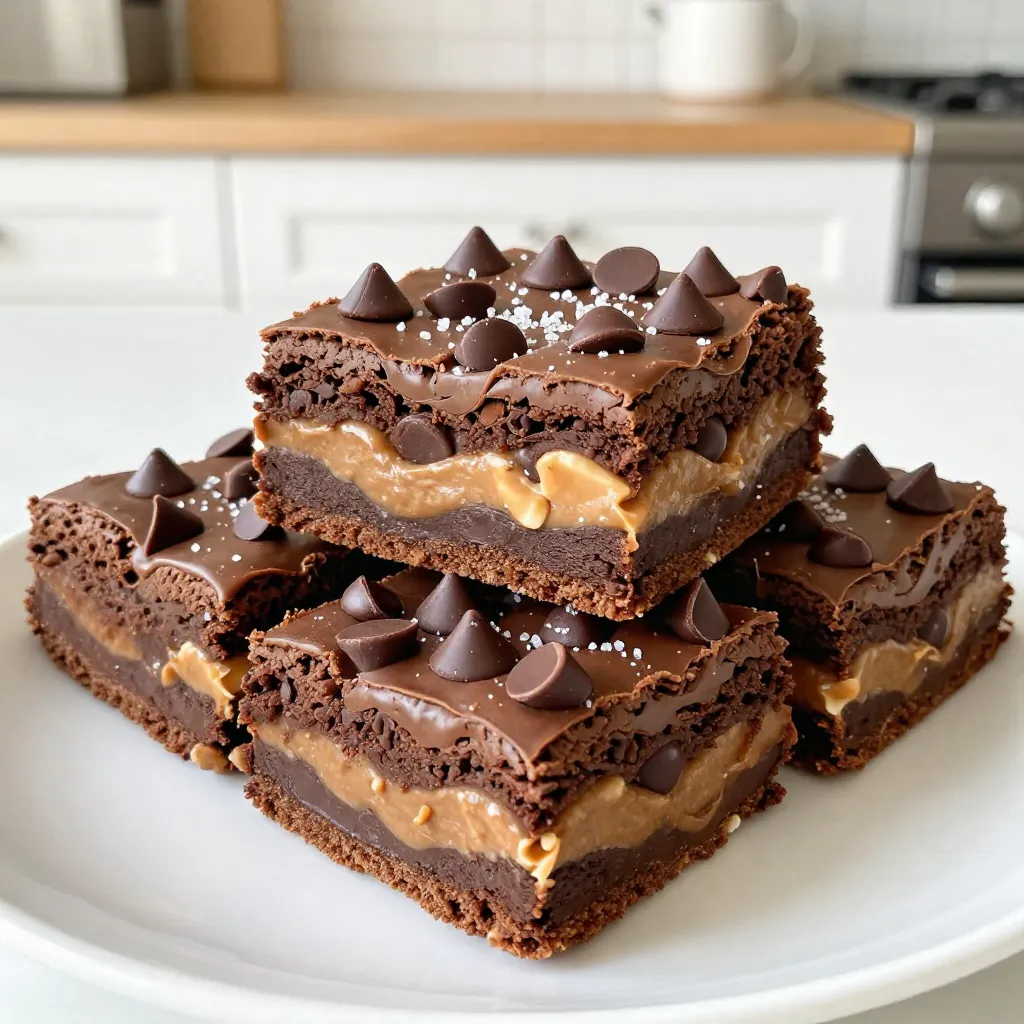
Craving a sweet treat that combines rich chocolate and creamy peanut butter? You’re in the right place! These Peanut Butter Cup Brownie Bars are a perfect dessert for any occasion. With a gooey chocolate base and a smooth peanut butter layer, these bars are sure to impress. Let me guide you step-by-step in creating this decadent dessert that will satisfy your sweet tooth. Ready to dive in? Let’s get baking!
Why I Love This Recipe
- Indulgent Flavor Combination: The rich chocolate brownie paired with creamy peanut butter and mini peanut butter cups creates a decadent treat that satisfies sweet cravings.
- Easy to Make: With straightforward steps and minimal preparation, these brownie bars are perfect for both beginner and experienced bakers.
- Perfect for Sharing: This recipe yields a generous batch, making it ideal for parties, gatherings, or simply to share with family and friends.
- Customizable Toppings: Add your favorite toppings like chocolate chips or sea salt to elevate the flavor and presentation of these delicious bars.
Ingredients
To make Peanut Butter Cup Brownie Bars, you will need a few key ingredients. Each one plays a part in making these bars rich and tasty.
List of Ingredients
– 1 cup unsalted butter, melted
– 1 cup granulated sugar
– 1 cup packed brown sugar
– 4 large eggs
– 2 teaspoons vanilla extract
– 1 cup all-purpose flour
– 1 cup unsweetened cocoa powder
– 1/2 teaspoon salt
– 1/2 teaspoon baking powder
– 1 cup creamy or crunchy peanut butter
– 1 cup mini peanut butter cups, chopped
– 1/2 cup chocolate chips (optional, for topping)
– Sea salt for sprinkling (optional)
You start with unsalted butter to keep the salt level just right. The sugars add sweetness and help make the bars chewy. Eggs bind everything together, while vanilla gives a warm flavor.
Next, you have flour and cocoa powder, which create the brownie base. Salt and baking powder help the bars rise and balance the sweet taste. Peanut butter adds a creamy richness, and mini peanut butter cups bring in fun bites of flavor.
You can top the bars with chocolate chips for extra richness and a sprinkle of sea salt adds a nice touch. Each ingredient is important to create a bite that is rich and decadent. Happy baking!

Step-by-Step Instructions
Preparation Steps
1. First, preheat your oven to 350°F (175°C). This step is key for even baking.
2. Next, grease a 9×13 inch baking dish. Line it with parchment paper, leaving some overhang. This makes it easy to lift the bars out later.
3. In a large bowl, mix the melted butter, granulated sugar, and brown sugar. Whisk them together until smooth.
4. Add the eggs one at a time. Mix well after each egg. Then, stir in the vanilla extract until combined.
5. In another bowl, sift together the flour, cocoa powder, salt, and baking powder. Gradually fold this dry mix into the wet mix. Stop when no dry bits remain.
Layering and Baking
1. Pour half of the brownie batter into the prepared dish. Spread it evenly to form your base layer.
2. Warm the peanut butter slightly if needed. This makes it easier to spread. Drop spoonfuls of peanut butter over the brownie base and spread gently.
3. Sprinkle the chopped mini peanut butter cups over the peanut butter layer. This adds tasty surprises in each bite.
4. Next, pour the remaining brownie batter over the top. Use a spatula to cover the peanut butter cups completely.
5. If you want an extra treat, sprinkle chocolate chips on top of the final layer.
Baking and Cooling
1. Bake the brownie bars for 25-30 minutes. Check if they are done by looking for set edges and a soft center. A toothpick should come out with a few moist crumbs.
2. Once baked, take the dish out and let the bars cool in the pan for about 20 minutes. For extra flavor, sprinkle some sea salt on top.
3. Carefully lift the brownies from the pan using the parchment paper overhang. Transfer them to a wire rack to cool completely before cutting into bars.
Tips & Tricks
Perfecting Your Brownie Bars
To make the best brownie bars, avoid over-mixing your batter. When you mix the dry and wet ingredients, stir just until you see no dry bits. Over-mixing can lead to tough brownies, which is not what we want.
Checking for doneness is key. Bake your bars for 25-30 minutes. Look for edges that are set while the center is still soft. A toothpick test helps here. If it comes out with some moist crumbs, you are good to go!
Serving Suggestions
Presentation matters! For an attractive display, stack your brownie bars on a tiered cake stand. You can also arrange them on a rustic wooden board for a cozy vibe.
Garnishing can add a fun touch. Try adding extra mini peanut butter cups on top. A light dusting of powdered sugar gives a sweet look that draws the eye.
Pro Tips
- Use Room Temperature Ingredients: Make sure your eggs and peanut butter are at room temperature for better incorporation into the batter, leading to a smoother texture.
- Don’t Overmix: When combining wet and dry ingredients, mix just until no dry streaks remain. Overmixing can result in dense brownies.
- Check for Doneness: For perfectly fudgy brownies, remove them from the oven when the edges are set but the center still looks slightly underbaked; it will continue to cook as it cools.
- Store Properly: To keep your brownie bars fresh, store them in an airtight container at room temperature for up to 5 days, or refrigerate for longer shelf life.
Variations
Flavor Swaps
You can make these peanut butter cup brownie bars even more exciting! Here are a few ideas:
– Using different nut butters: Swap creamy peanut butter for almond or cashew butter. Each nut butter brings its own unique flavor. Almond butter adds a slight sweetness. Cashew butter is creamy and mild. These swaps can change the taste while keeping it rich and delicious.
– Adding flavored chocolate chips: Consider using flavored chocolate chips, like mint or caramel. These can elevate the flavors. Just toss them into the batter with the mini peanut butter cups. It’s a simple way to create a fun twist on this classic treat.
Dietary Considerations
I know some of you may have special dietary needs. Here are options to make these brownie bars fit your lifestyle:
– Gluten-free substitutions: To make these brownie bars gluten-free, switch the all-purpose flour for a gluten-free blend. Look for a blend that works cup-for-cup. This will keep the texture light and fluffy. You won’t miss the gluten at all!
– Vegan alternatives for the recipe: To make this recipe vegan, replace the eggs with flax eggs. Mix one tablespoon of ground flaxseed with three tablespoons of water for each egg. Use a plant-based butter and vegan chocolate chips. These simple swaps will make your bars friendly for everyone!
Storage Info
Storing Leftovers
To keep your brownie bars fresh, store them in an airtight container. This helps prevent them from drying out. You can keep them at room temperature for up to three days. If you live in a warm place, I recommend refrigerating them. This keeps the bars cool and tasty for up to a week.
Freezing Tips
If you want to enjoy these brownie bars later, freezing works well. First, let the bars cool completely. Then, wrap them tightly in plastic wrap. After that, place them in a freezer-safe bag. These bars can last for up to three months in the freezer.
When you’re ready to enjoy them, take the bars out of the freezer. Let them thaw in the fridge overnight for the best texture. You can also warm them in the microwave for a few seconds. This brings back that fresh-baked taste!
FAQs
How can I tell when the brownies are done baking?
You can check if the brownies are done by looking at the edges. They should be set, while the center stays slightly soft. A toothpick inserted into the center may come out with a few moist crumbs. This means they are ready!
Can I use crunchy peanut butter instead of creamy?
Yes, you can use crunchy peanut butter if you like extra texture. It adds a fun crunch to each bite. Just make sure to mix it in well so it spreads evenly.
What’s the best way to cut brownies without them falling apart?
To cut brownies neatly, let them cool completely. Use a sharp knife and wipe it clean between cuts. You can also chill the brownies in the fridge for easier slicing.
Are these bars suitable for freezing?
Absolutely! These peanut butter cup brownie bars freeze well. Just wrap them tightly in plastic wrap or foil before placing them in an airtight container.
How long do they last after baking?
If stored properly at room temperature, they last about 3-4 days. In the fridge, they can last up to a week. Freezing extends their life for about 2-3 months.
You learned how to make tasty brownie bars step by step. We covered ingredients, preparation, baking, and cooling. I shared tips to perfect your bars and how to store leftovers properly. You can swap flavors and meet dietary needs, too. Remember, a simple recipe can lead to delicious treats. Enjoy your baking adventure and savor each bit