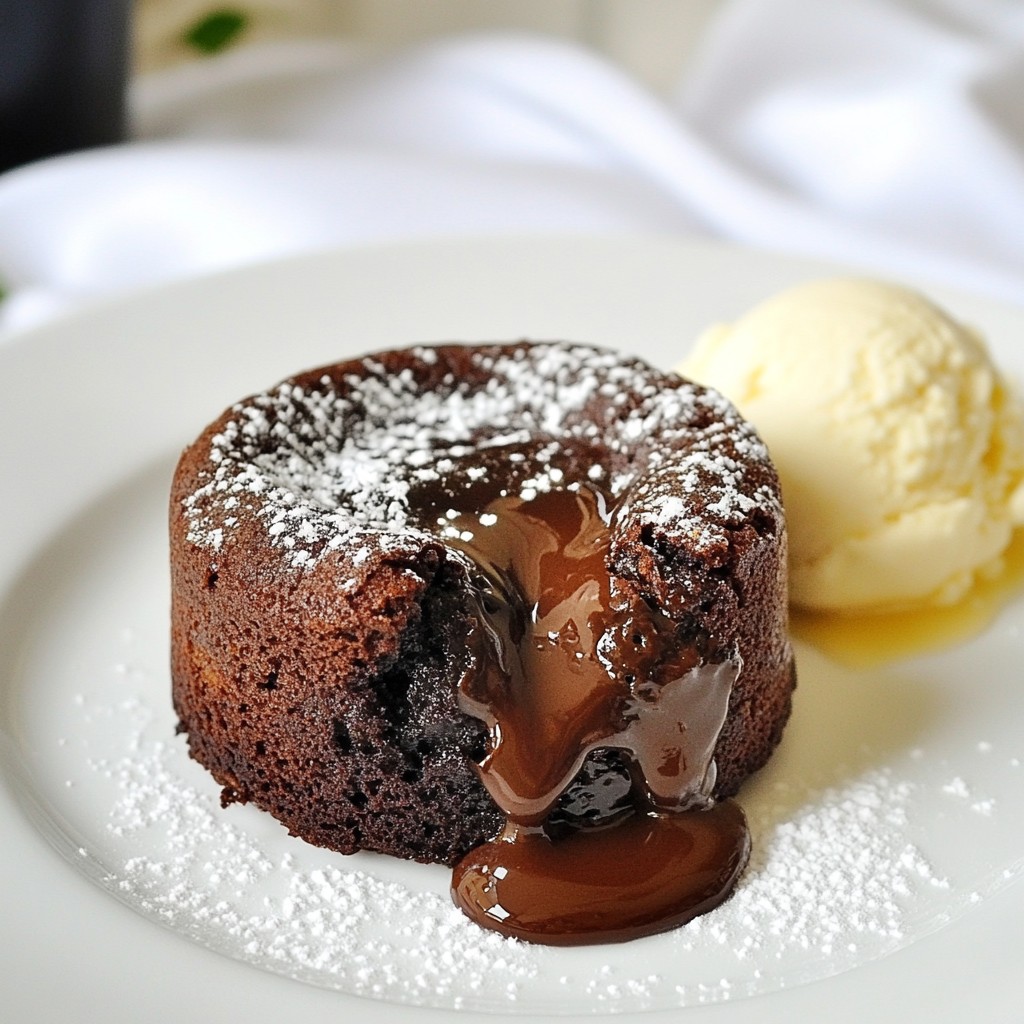
Craving something sweet without the sugar? You’re in the right place! Today, I’m excited to share my gooey sugar-free chocolate lava cake recipe. These delightful treats bring rich chocolatey goodness to the table. With simple ingredients like sugar-free dark chocolate and applesauce, you’ll whip up a dessert that’s both satisfying and guilt-free. Let's dive into the recipe that will impress both your taste buds and your health goals!
Why I Love This Recipe
- Decadent Flavor: The rich taste of dark chocolate combined with the gooey center creates an indulgent dessert that feels like a treat from a fine restaurant.
- Healthy Twist: Using unsweetened applesauce and sugar-free chocolate chips allows you to enjoy a dessert that is lower in sugar and calories without sacrificing taste.
- Quick and Easy: This recipe takes just 10 minutes of prep time, making it perfect for a spontaneous dessert when cravings strike.
- Impressive Presentation: The molten center is sure to wow your guests, making these lava cakes perfect for entertaining or special occasions.
Ingredients
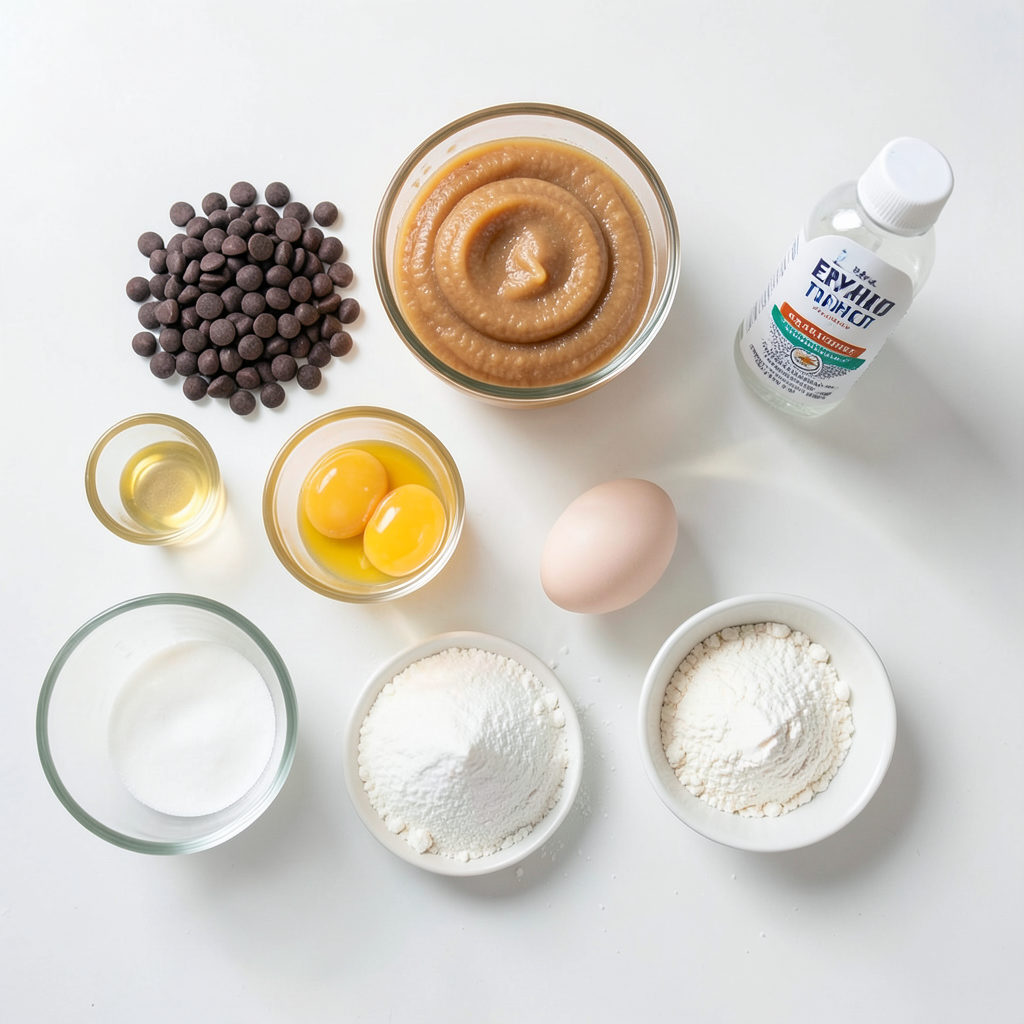
List of Ingredients
- 1 cup sugar-free dark chocolate chips
- 1/2 cup unsweetened applesauce
- 2 large eggs
- 2 egg yolks
- 1/4 cup coconut flour
- 1/4 teaspoon baking powder
- 1/4 teaspoon sea salt
- 1 teaspoon vanilla extract
- Cooking spray (for greasing ramekins)
- Optional: Powdered erythritol for dusting
For gooey sugar-free chocolate lava cakes, we need specific ingredients that make them rich and tasty. First, we use sugar-free dark chocolate chips. These chips melt smoothly and give us that yummy chocolate flavor. Next, we have unsweetened applesauce. It adds moisture and acts as a sweetener without sugar.
You will also need large eggs and egg yolks. They help give the cake its structure and richness. Coconut flour is key for binding our cake while keeping it gluten-free. Baking powder and sea salt enhance the flavors and help the cake rise.
Don’t forget vanilla extract! It adds warmth and depth to our cakes. Cooking spray is essential for greasing ramekins, so the cakes come out easily. Lastly, powdered erythritol is optional, but it adds a nice touch if you want to dust your cakes before serving.
These ingredients come together to create a delightful treat that everyone can enjoy, even those watching their sugar intake!
Step-by-Step Instructions
Preparation Steps
1. Preheat your oven to 425°F (220°C). Grease four ramekins with cooking spray. This helps to prevent sticking. For ease, place the ramekins on a baking sheet.
2. In a microwave-safe bowl, add your sugar-free dark chocolate chips. Melt them in the microwave in 30-second bursts. Stir well after each burst. Keep melting until smooth. Let the melted chocolate cool slightly.
3. In a mixing bowl, combine the cooled chocolate with unsweetened applesauce. Stir until the mix is smooth and well-blended.
4. Crack in the large eggs and egg yolks. Add the vanilla extract. Whisk the mixture well until it is smooth and creamy.
Combining Dry Ingredients
1. Carefully fold in the coconut flour, baking powder, and sea salt. Use a spatula or wooden spoon. Mix until the batter is well-combined. It’s okay if there are a few lumps.
2. Check the consistency of your batter. It should be thick but pourable. If it’s too thick, you can add a small amount of water.
Baking and Serving
1. Evenly fill the ramekins with the batter. Fill each about three-quarters full. This allows room for the cakes to rise in the oven.
2. Place the baking sheet with the ramekins in the oven. Bake for 12-14 minutes. The edges should be firm, but the centers should still be soft and jiggly.
3. When baked, take the ramekins out of the oven. Let the cakes cool for about 1 minute. Run a knife around the edges to loosen them. Carefully invert the ramekins onto dessert plates.
4. If you want, dust the warm lava cakes with powdered erythritol for extra sweetness. Serve them right away to enjoy the gooey chocolate center.
Tips & Tricks
Achieving the Perfect Gooey Center
Timing is key to getting that perfect gooey center. Bake your lava cakes for 12 to 14 minutes. The edges should look firm, but the center must jiggle slightly. If it looks set all the way through, you’ve baked it too long.
Look for these signs when your cakes are done:
- Edges are firm
- Centers are soft and jiggly
- A toothpick inserted should come out with moist batter
Enhancing Flavor
You can elevate the taste of your lava cakes with simple add-ins. Try adding:
- A pinch of espresso powder for a rich flavor
- A drop of almond extract for a nutty twist
- A tablespoon of orange zest for a fresh zing
For toppings, fresh berries or a dollop of sugar-free cream work wonders. They add color and a burst of flavor that pairs well with chocolate.
Common Mistakes to Avoid
Be careful not to over-mix your batter. A few lumps are okay; they help keep the texture light. Over-mixing makes the cakes dense and less gooey.
Also, ensure you grease the ramekins properly. If you skip this step, your cakes may stick. Use cooking spray generously to avoid any sticking disasters.
Pro Tips
- Perfect Chocolate Melting: Use a microwave-safe bowl and melt the chocolate in 30-second intervals to prevent overheating and ensure a smooth consistency.
- Cool the Chocolate: Allow the melted chocolate to cool slightly before mixing with other ingredients to prevent cooking the eggs when combined.
- Check for Doneness: The perfect lava cake should have a firm edge but a soft, jiggly center. Keep an eye on the baking time to achieve this texture.
- Serving Suggestion: Pair your lava cake with sugar-free vanilla ice cream or fresh berries for a delightful contrast in flavor and texture.
Variations
Different Chocolate Options
You can change the taste of your lava cakes by using different types of chocolate. Try using milk chocolate or even white chocolate chips. These options add sweetness and a creamy texture. You can also mix in chocolate with different cocoa levels. A higher cocoa content gives a richer flavor. A lower content is sweeter and milder. Experiment to find your favorite!
Vegan Adaptations
If you want a vegan version, replace the eggs. Flaxseed meal or chia seeds work well. Mix one tablespoon of either with three tablespoons of water. Let it sit for a few minutes to thicken. You can also use plant-based milk or yogurt instead of applesauce. Replace the coconut flour with almond or oat flour for a tasty twist. These swaps keep the cakes moist and delicious!
Dietary Modifications
For those avoiding gluten, use gluten-free flour. Almond flour or a gluten-free blend works great. You can also make low-carb lava cakes by switching to almond flour or coconut flour. These options keep the carb count low while still being tasty. Make sure to check labels for any hidden sugars in your ingredients. Enjoy your sweet treat without worry!
Storage Info
Proper Cooling and Storage
After baking, let your lava cakes cool for about one minute. This step helps them set a bit. To store them, gently run a knife around the edges. This will help you remove them from the ramekins without breaking. Place the cakes in a single layer in an airtight container. Use one that fits snugly to avoid any movement.
Refrigeration and Freezing
Lava cakes stay fresh in the fridge for up to three days. If you want to keep them longer, freezing is a great option. Wrap each cooled cake in plastic wrap, then place them in a freezer-safe bag. They can last for up to three months in the freezer. When you’re ready to enjoy them, simply thaw in the fridge overnight.
Reheating Instructions
To reheat your lava cakes, preheat your oven to 350°F (175°C). Place the cakes on a baking sheet and warm them for about 10 minutes. This method helps keep the centers gooey. You can also use the microwave. Heat on low power for about 20 to 30 seconds. Check often to avoid overheating, which can ruin the lava effect. Enjoy your leftover treats warm!
FAQs
How do I know when chocolate lava cakes are done?
You can tell when chocolate lava cakes are done by looking at the edges. They should be firm and set. The center should look soft and jiggle slightly. This soft center is key to that gooey effect. If you bake them too long, they will not have the lava filling you want.
Can I prepare the batter ahead of time?
Yes, you can prepare the batter ahead of time. Just mix all your ingredients and store them in the fridge. When you’re ready to bake, pour the batter into the greased ramekins. Bake them straight from the fridge. This makes it easy for last-minute treats.
What can I serve with gooey chocolate lava cakes?
You can serve these cakes with many treats. A scoop of sugar-free vanilla ice cream is a great choice. Fresh berries also add nice colors and flavors. You can dust the cakes with powdered erythritol for extra sweetness. These pairings make each bite more joyful.
How do I make sugar-free lava cakes vegan?
To make sugar-free lava cakes vegan, simply swap eggs for flaxseed meal or chia seeds. Mix one tablespoon of flaxseed meal with three tablespoons of water. Let it sit for five minutes to thicken. You can use the same amount as eggs in the recipe. This keeps the texture nice and moist.
Are there alternative sweeteners I can use?
Yes, there are many alternative sweeteners you can use. Stevia and monk fruit are popular choices for sugar-free baking. They add sweetness without the calories. You can also use erythritol or xylitol. Each gives a different flavor, so try what you like best!
You’ve learned how to make delicious chocolate lava cakes using simple ingredients. We covered the steps from mixing to baking, ensuring a gooey center and adding tasty variations. Remember, timing and the right texture are key to success. With the tips provided, you can avoid common mistakes and enhance flavors. Now, get ready to impress with your homemade treats. Enjoy every gooey bite!