
Get ready to delight your taste buds with my easy Cranberry Orange Scones recipe! Perfect for breakfast or a cozy afternoon treat, these scones blend sweet cranberries and zesty orange for a tasty bite. With simple ingredients and step-by-step instructions, you’ll bake like a pro—even if you’re a beginner. Join me as we dive into this fun and satisfying recipe that promises to impress your family and friends!
Why I Love This Recipe
- Perfectly Balanced Flavors: The combination of tart cranberries and zesty orange creates a delightful taste that is both refreshing and comforting.
- Easy to Make: This scone recipe is straightforward, making it perfect for both novice bakers and seasoned pros looking for a quick treat.
- Versatile Treat: These scones are ideal for breakfast, brunch, or even as a sweet snack with your afternoon tea.
- Beautiful Presentation: With their inviting orange glaze and festive garnishes, these scones are not only delicious but also a feast for the eyes.
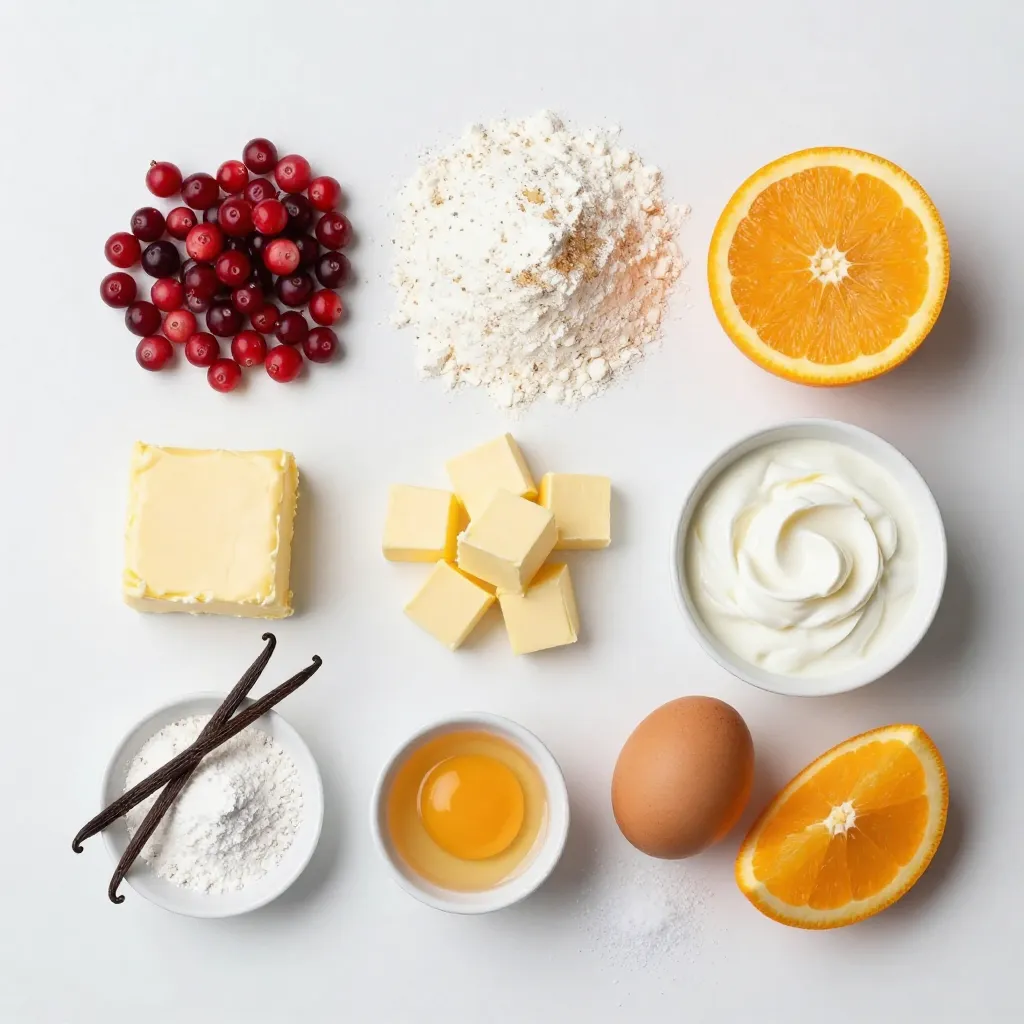
Ingredients
Here are the ingredients you need to make delicious cranberry orange scones:
– 2 cups all-purpose flour
– 1/3 cup granulated sugar
– 1 tablespoon baking powder
– 1/2 teaspoon fine salt
– 6 tablespoons unsalted butter, cold and cut into small cubes
– 1/2 cup fresh or dried cranberries
– Zest of 1 large orange
– 1/2 cup heavy cream
– 1 large egg
– 1 teaspoon pure vanilla extract
– 1/2 cup powdered sugar (for glaze)
– 1-2 tablespoons fresh orange juice (for glaze)
These simple ingredients blend to create a burst of flavor. The cranberries add tartness, while the orange zest brightens each bite. The heavy cream gives the scones a rich texture. Using cold butter creates those perfect flaky layers.
When sourcing your ingredients, opt for fresh cranberries if possible. They provide a wonderful pop of flavor. If fresh ones are out of season, dried cranberries work just fine. You can also use organic sugar for a cleaner taste.
Gather these ingredients, and you’re ready to start baking!
Step-by-Step Instructions
Preheat the Oven
First, preheat your oven to 400°F (200°C). This step is key for the perfect bake. Line a baking sheet with parchment paper. This makes clean-up easy.
Mixing Dry Ingredients
In a large bowl, mix the dry ingredients. Combine 2 cups of all-purpose flour, 1/3 cup of granulated sugar, 1 tablespoon of baking powder, and 1/2 teaspoon of fine salt. Whisk them together well. This helps the scones rise nicely.
Incorporating Butter
Next, add 6 tablespoons of cold, cubed butter. Use your fingertips or a pastry cutter to blend it in. Keep blending until the mixture has pea-sized crumbs. This texture gives the scones their flakiness.
Adding Cranberries and Orange Zest
Now, gently fold in 1/2 cup of cranberries and the zest of 1 large orange. Make sure to mix evenly. This gives the scones their fruity and zesty flavor.
Preparing Wet Ingredients
In another bowl, whisk together 1/2 cup of heavy cream, 1 large egg, and 1 teaspoon of pure vanilla extract. Mix until it is well combined. This mixture will add moisture to your dough.
Combining Mixtures
Gradually pour the wet ingredients into the dry mix. Use a spatula to stir gently. Be careful not to over-mix. Over-mixing can make the scones tough.
Shaping and Cutting Dough
Transfer the dough to a lightly floured surface. Knead it gently a few times. Shape it into a circle, about 1-inch thick. Cut the dough into 8 wedges, like a pizza. Place them on the baking sheet, leaving space between each piece.
Baking the Scones
Bake the scones for about 15-20 minutes. Look for a light golden brown color on the edges. As they bake, your kitchen will fill with a wonderful aroma. This means they are almost ready!
Tips & Tricks
Achieving the Perfect Texture
For light and fluffy scones, use cold butter. Cut it into small cubes and mix it quickly. You want to see small butter pieces in the dough. This creates air pockets as they bake. Avoid over-mixing. Mix until just combined. This keeps your scones tender and not tough.
How to Store Leftover Scones
Store leftover scones in an airtight container. They stay fresh for about two days. If you want to keep them longer, freeze them. Wrap each scone in plastic wrap. Then place them in a freezer bag. They can last up to three months in the freezer.
Serving Suggestions
Serve these scones warm for the best taste. They pair well with tea or coffee. Try adding a dollop of clotted cream or butter. Fresh fruit, like strawberries or blueberries, adds a nice touch. Enjoy them for breakfast or as a snack during the day. The citrus flavor makes them perfect for brunch!
Pro Tips
- Use Cold Ingredients: Ensure your butter and cream are cold to create flaky layers in your scones.
- Don’t Overmix: Gently combine the wet and dry ingredients to avoid tough scones; a light touch is key!
- Experiment with Add-Ins: Feel free to add nuts or other dried fruits for a personalized touch to your scones.
- Serve Warm: These scones are best enjoyed warm, so serve them fresh out of the oven for the ultimate experience.
Variations
Using Dried Fruit Alternatives
You can swap fresh cranberries for other dried fruits. Dried cherries, blueberries, or raisins work well. They add a sweet twist to the scones. Just keep the amount the same. You will still get a tasty treat!
Adding Nuts or Seeds
Adding nuts or seeds gives a nice crunch. Chopped walnuts, pecans, or almonds are great choices. You can also try pumpkin seeds or sunflower seeds. Mix in about half a cup with the cranberries. This extra texture makes each bite exciting!
Gluten-Free Substitutions
To make these scones gluten-free, use a gluten-free flour blend. Look for one that has xanthan gum in it. This helps the scones hold together. You may need to adjust the liquid slightly. Start with the same amount and add more if the dough is dry. Enjoy your gluten-free cranberry orange scones!
Storage Info
Short-term Storage Tips
Store your cranberry orange scones in an airtight container. They stay fresh for about 2-3 days at room temperature. To keep them soft, place a slice of bread in the container. The bread will help maintain moisture.
Long-term Freezing Instructions
For longer storage, freeze your scones. First, let them cool completely. Wrap each scone tightly in plastic wrap, then place them in a freezer bag. They will last for up to 3 months in the freezer. When you’re ready to enjoy, just thaw them in the fridge overnight.
Reheating Best Practices
Reheat scones in the oven for the best results. Preheat your oven to 350°F (175°C). Place the scones on a baking sheet and warm them for 10-15 minutes. This restores their fresh-baked taste and texture. You can also use a microwave, but this may make them a bit chewy. Heat them for about 15-20 seconds. Enjoy your delicious scones warm!
FAQs
What can I substitute for heavy cream?
You can use whole milk or half-and-half. These options work well in scones. If you want a thicker texture, add a bit of butter to the milk. This will help mimic heavy cream’s richness.
Can I use frozen cranberries?
Yes, you can use frozen cranberries! Just make sure to thaw them before mixing. This will help them blend better in the dough. If you use them frozen, the scones may bake longer due to extra moisture.
How can I make these scones less sweet?
To reduce sweetness, cut back on sugar. Try using 1/4 cup of granulated sugar instead of 1/3 cup. You can also skip the glaze if you want a less sweet scone. The orange zest will still add a nice flavor.
What is the best way to serve cranberry orange scones?
Serve these scones warm for the best taste. Pair them with butter or clotted cream. They also taste great with tea or coffee. For a special touch, add fresh orange slices or berries on the side.
How long do these scones last?
Cranberry orange scones stay fresh for about 2 days at room temperature. Store them in an airtight container to keep them soft. You can freeze them for up to a month. Just reheat before serving for the best flavor.
We covered the key ingredients and steps to make delicious cranberry orange scones. You learned how to mix, bake, and even store them. Explore variations and tips to make them your own. Scones are a tasty treat at any time of day. Enjoy them fresh or with your favorite spread. With these simple steps, you can impress friends and family. Now, it’s time to bake and enjoy this delightful recip