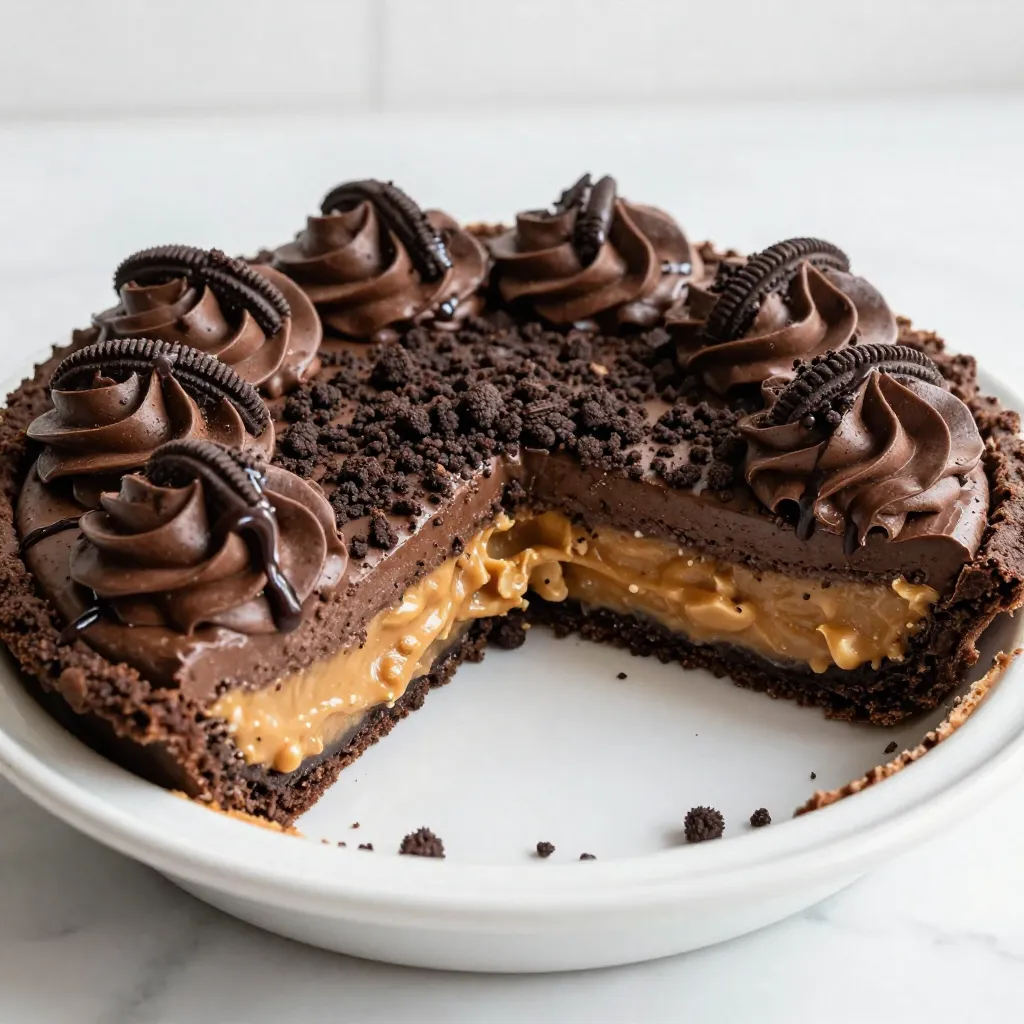
Get ready to indulge in a heavenly dessert: the Chocolate Peanut Butter Oreo Pie! This treat combines creamy peanut butter, rich chocolate, and classic Oreos for a dessert that will wow any crowd. Whether you’re a baking novice or a seasoned pro, my step-by-step guide makes it easy to create this dreamy pie. Let’s dive into the ingredients and bring joy to your taste buds!
Why I Love This Recipe
- Decadent Flavors: This pie combines the rich taste of chocolate, creamy peanut butter, and crunchy Oreo cookies, creating a dessert that is both indulgent and satisfying.
- Easy to Make: With simple ingredients and straightforward steps, this recipe is perfect for both novice and experienced bakers looking to impress.
- Perfect for Any Occasion: Whether it’s a birthday, holiday, or just a weekend treat, this pie is sure to be a crowd-pleaser at any gathering.
- Customizable: You can easily adapt this recipe by adding toppings or mixing in your favorite ingredients, making it uniquely yours.
Ingredients
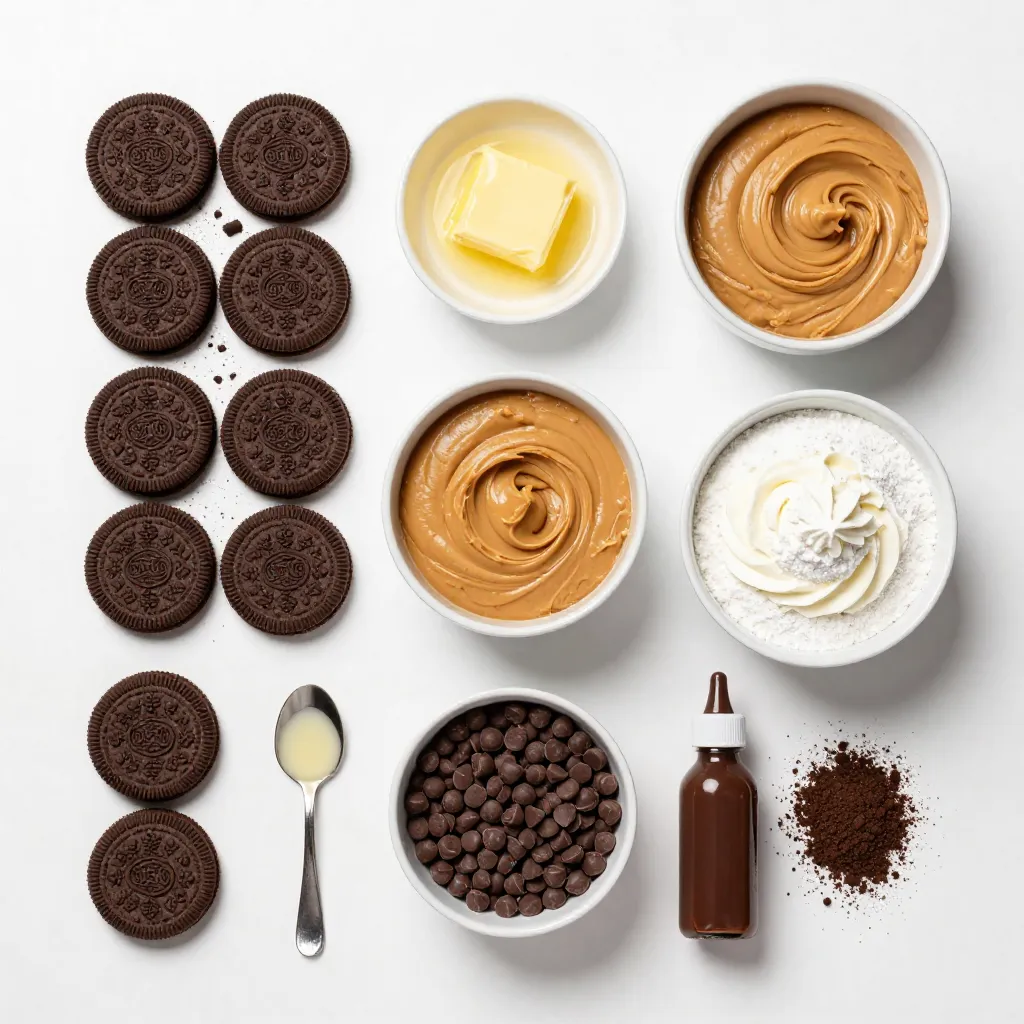
Detailed Ingredient List
– 24 Oreo cookies, finely crushed
– 1/4 cup unsalted butter, melted
– 1 cup creamy peanut butter
– 1 cup powdered sugar
– 1 cup heavy whipping cream
– 8 oz cream cheese, softened at room temperature
– 1 teaspoon vanilla extract
– 1/2 cup semi-sweet chocolate chips
– 1/4 cup chocolate syrup (optional for drizzling)
– Extra Oreo crumbs for garnish
To make this Chocolate Peanut Butter Oreo Pie, gather your ingredients first. Use 24 Oreo cookies and crush them finely. This will form the pie crust. You will need 1/4 cup of unsalted butter, melted, to mix with the crushed cookies.
For the filling, grab 1 cup of creamy peanut butter and 8 ounces of cream cheese. Soften the cream cheese to get smooth mixing. You’ll also need 1 cup of powdered sugar to sweeten the filling.
Next, for the whipped topping, use 1 cup of heavy whipping cream. Whip it until stiff peaks form. You will add 1 teaspoon of vanilla extract for flavor. To finish, use 1/2 cup of semi-sweet chocolate chips for melting and drizzling.
For a tasty touch, you can drizzle 1/4 cup of chocolate syrup on top if you like. Lastly, keep extra Oreo crumbs for garnish. This adds a nice crunch and looks great!
Step-by-Step Instructions
Preparing the Crust
1. In a medium bowl, mix 24 crushed Oreo cookies with 1/4 cup melted butter.
2. Stir until all crumbs are coated with butter.
3. Press this mixture firmly into a 9-inch pie dish.
4. Make sure to cover the bottom and sides well.
5. Chill the crust in the refrigerator while you make the filling.
Mixing the Peanut Butter Filling
1. In a large bowl, beat 1 cup creamy peanut butter and 8 oz softened cream cheese.
2. Use an electric mixer on medium speed until smooth.
3. Gradually add 1 cup powdered sugar while mixing.
4. Keep mixing until there are no lumps and the mixture is creamy.
Whipping the Cream
1. In a separate bowl, whip 1 cup heavy cream on high speed.
2. Keep whipping until stiff peaks form, about 2 to 3 minutes.
3. Gently fold the whipped cream into the peanut butter mixture.
4. Use a spatula and be careful not to deflate the whipped cream.
Assembling the Pie
1. Pour the peanut butter filling into the chilled Oreo crust.
2. Spread it evenly with a spatula. Make sure it reaches the edges.
Melting the Chocolate
1. In a microwave-safe bowl, heat 1/2 cup semi-sweet chocolate chips.
2. Do this in 30-second intervals, stirring each time.
3. Once melted and smooth, drizzle the chocolate over the filling.
Final Steps
1. Cover the pie with plastic wrap and chill for at least 4 hours.
2. Just before serving, drizzle 1/4 cup chocolate syrup on top.
3. Sprinkle extra Oreo crumbs for a nice crunch.
4. Slice and serve chilled. Enjoy every bite!
Tips & Tricks
Perfecting the Oreo Crust
To make a firm Oreo crust, press the cookie mixture hard into the dish. This helps it hold its shape. If you want to skip butter, use coconut oil. It gives a nice flavor and works well.
Achieving the Creamy Filling
Mix the peanut butter and cream cheese slowly at first to avoid lumps. Gradually add the powdered sugar while mixing. This keeps the filling smooth and creamy. For the best texture, make sure the cream cheese is soft.
Presentation Tips
Serve slices on pretty plates for a nice touch. Add a dollop of whipped cream on each slice. This makes it look fancy. Drizzle more chocolate on top and sprinkle extra Oreo crumbs for a fun finish.
Pro Tips
- Use Room Temperature Ingredients: Make sure your cream cheese is softened to room temperature before mixing. This will help achieve a smoother filling without lumps.
- Quality Chocolate Matters: Using high-quality semi-sweet chocolate chips will enhance the flavor of the pie. Consider using a chocolate brand you love for the best results.
- Chill Time is Key: Allow the pie to chill for the full 4 hours, or overnight if possible. This will ensure that the filling sets properly and holds its shape when sliced.
- Decorate with Style: For an elegant touch, use a piping bag to drizzle the chocolate syrup in a decorative pattern on top of the pie before serving.
Variations
Different Oreo Flavors
You can use many Oreo flavors to change this pie’s taste. Try mint, peanut butter, or birthday cake Oreos! Each flavor adds a unique twist to the pie. The mint Oreos give a fresh touch, while the peanut butter Oreos boost the peanut flavor. Choose your favorite to make a pie that suits your taste buds.
Alternative Nut Butters
If you want to mix things up, consider using almond or cashew butter instead of peanut butter. Almond butter gives a nutty and slightly sweet flavor. Cashew butter offers a creamy and rich taste. Both options make the pie delightful and keep the texture smooth. Feel free to try these nut butters for a new experience.
Vegan Options
For a vegan version, swap out the cream cheese and whipping cream. Use coconut cream as a base for the filling. You can also try silken tofu blended to a smooth texture. For sweetening, use powdered sugar or maple syrup. These simple swaps keep the pie creamy and delicious while meeting vegan needs. Enjoy all the flavors without the dairy!
Storage Info
How to Store Leftover Pie
Store any leftover pie in the fridge. Cover it tightly with plastic wrap or foil. This keeps the pie fresh and tasty. You can also freeze the pie. Just slice it first, then wrap each piece well. Use freezer-safe bags or containers for best results.
Shelf Life of the Pie
The pie stays good in the fridge for about 3 to 4 days. If you freeze it, it can last up to 2 months. Just remember, the sooner you eat it, the better it tastes!
Reheating Tips
To serve leftovers, let the pie sit at room temperature for about 10 minutes. This helps the filling soften a bit. You can also pop it in the microwave for 15 to 20 seconds. Just make sure to check it often to avoid melting the crust. Enjoy your tasty treat!
FAQs
Can I make this pie ahead of time?
Yes, you can make this pie ahead of time. To prepare in advance, follow these steps:
– Make the pie and chill it for at least 4 hours.
– Cover it tightly with plastic wrap or foil.
– Store it in the fridge for up to 3 days.
This way, you save time and still enjoy a delicious treat.
What can I use instead of cream cheese?
If you need to avoid cream cheese, try these options:
– Mascarpone cheese for a similar flavor.
– Greek yogurt for a lighter option.
– Silken tofu for a dairy-free choice.
These substitutes keep the pie creamy and tasty.
How do I fix a runny filling?
A runny filling can happen if you mix too quickly. To fix it:
– Add more powdered sugar to thicken the mix.
– Chill the pie longer in the fridge.
– Whip more cream and fold it in gently.
These steps help achieve a firm, smooth filling.
Can I use homemade whipped cream?
Yes, you can use homemade whipped cream! Here’s how:
– Whip heavy cream until stiff peaks form.
– Gently fold it into the peanut butter mix.
– Avoid over-mixing to keep it fluffy.
Homemade whipped cream adds a fresh touch to your pie!
This pie combines simple ingredients for a delicious treat. You learn to create a crunchy Oreo crust and a creamy peanut butter filling. With tips for perfecting texture and presentation, you can impress anyone. Explore variations based on your taste or dietary needs. Remember to store leftovers correctly for the best flavor. Enjoy this satisfying dessert and have fun making it. Your kitchen adventures can lead to tasty reward